Pages

Showing posts with label retro. Show all posts

Friday, October 22, 2010

Doug Up In Sydney


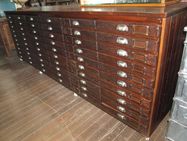
As I mentioned in my last post, my favourite store on my Sydney trip was Doug Up On Bourke. For those of you who are not familiar with the store it is a treasure trove of antiques and collectables, and is one of the largest single stores of its kind in Sydney. One of the best parts is that all of their stock is sourced in Australia and they specialise in mid 1800's to late 1950's! I could have stayed in this store for hours looking at all the interesting objects .... well we were in there an hour and a half!

Thought I would share with you what I managed to dig up on Bourke along with some of the fantastic things they stock.

Love it all ....

Wish I had room for this one ...
How cool are globes at the moment?!

They stock lots of shoe lasts - along with cute little child size ones ....

One of my girlfriends bought an old green iron just like this one ....

They have a great selection of stools of all kinds ...

Speaking of stools, I am on the lookout for an old stool for my main bathroom. Maybe an old milking stool or something. If anyone has seen an old low stool for sale in Brisbane I'd love to check it out.

...... and now to what I managed to dig up ....


All images except for this one from Doug Up On Bourke

A really cute old recipe box for $10 which is perfect for holding all of my unframed artwork. A bobbin which I just had to have as I adore them $35, and an old ceramic electricity cover for $10 - not sure what I will do with this one yet! I was certainly happy with my little haul, but next time I need to allow a lot more room in my suitcase!!!

Doug Up On Bourke will not disappoint those looking for something different. They are located at 901 Bourke Street, Waterloo in Sydney.

Renovation Update: I am still in the thick of a renovation zone and have no decent pictures to show you all yet. I can report that I have gone over budget though (boo hoo). My initial budget was $15,000 as advised by my real estate mate, however, after setting myself a more realistic budget of $20,000 (we are talking two bathrooms here people) I am still struggling to stay under! More on that next week.

By the way, if you get a chance over the weekend, pop over to Natural Modern Interiors and take Lisa's Interior Design Workshop Poll - I know she would appreciate the feedback.

Have a great weekend everyone. Michelle

Friday, September 3, 2010

My Find!

Hope everyone has had a fantastic week! I can't believe it's Friday already!


Recently I discovered a gorgeous little store called 'Fairies at Work' which is packed to the brim with wonderful little goodies. Imagine a really, really, really, compact version of the W.A.C. along with every fantastic garage sale you have every been to - mix it all together - and .... voila you have 'Fairies at Work'! The owner is a sweet lady who sells vintage linens, kitchenware, china, jewellery, furniture .... and the list goes on.

I had no idea which way to look in this store, and admit I have to go back when I have more time for a closer look! But I did find a wonderful Glass Dome - yay - and only $20!!! I have been looking for a second hand one of these for what seems like forever, and finally found it in this magical little store. I guess fairies really were at work!

Below is my wonderful little glass dome (or cloche) sitting next to some very old plumbers lasts that I found in an antique store many years ago. Okay my dome didn't come with a fancy silver stand like the one in the image above ... but I think it is beautiful anyway!


I know I'm not the only one who likes to display items under glass....

Very pretty ...


The modern look ....


This one brought a smile to my face ....


My purchase got me thinking ...... what's under your dome? Would love it if you shared.

Wishing everyone a great weekend. Michelle

Thursday, July 22, 2010

More Reno After Images

Hi everyone, hope your having a great week. Last week I promised a photo of our kitchen as it looks today. I'm no photographer, and I did find our kitchen hard to photograph because of its galley style, anyway here are some after images:-


Yes, I usually have some form of baking in my kitchen - this is not a set-up! If you ask any of my friends they will tell you that my mother's chocolate slice is usually under the glass dome. My mother often bakes it for me (spoiled I know) but sometimes (when the cravings strike) I do bake it myself.

The artwork on the wall is one of my hearts.

If you missed the before images and want to check them out, you can see them here.


The image below is of my laundry - we replaced the bench top with the same stone as in the kitchen. We still have to get rid of the yellow cupboards (they matched the original kitchen colour) and re-tile the splashback ...... many jobs to do!


Lastly, I just thought I would share my mother's chocolate slice recipe as its a great winter one:-


For Chocolate Coconut Slice you will need:-
4 rounded tablespoons of butter
3/4 cup of sugar
1 egg
1/4 coconut
1/2 cup of sultanas
1 cup of flour
1 tea spoon of baking powder
2 tablespoons of cocoa (big ones - I usually put in 3!)
optional - but oh so good - 1 handful of roughly chopped cooking chocolate
1 tablespoon of milk

Then: Cream butter and sugar. Add egg beaten in the milk, then add all the dry ingredients and mix. Bake in moderate oven (180 degrees) for about 30 mins - I find that in my fan forced it is done in 20 mins.
Icing:- just do your favourite - we do 1 cup icing sugar; 2 big tbspns cocoa; 2 tbspns butter; small amount of water

Hope you enjoy this one. Have a great day. Michelle

p.s. I will be announcing my giveaway tomorrow so please pop back in and say hi!

Friday, July 16, 2010

Reno Before & Afters plus Another HR Find

Hello everyone, hope you are having a great week. As promised below are some before and afters of my lounge. This is where my husband and I spend most nights just chilling out. Once again, apologies for some of the images - I wasn't intending others to see them! Please also realise that my house is not 'staged' - this is how we live 'warts and all'.

Below is image of our lounge AFTER. The framed 'bus scrolls' are actually tea towels that I framed in Ikea frames for an all up cost each of $10!! The doorway to the right goes into the girls' playroom which we created from a car space in the garage that was originally for 4 cars.


Image below is BEFORE. Please note the horrible windows which you will see in the next set of 'after' images I have replaced with cafe style bi-folding windows with seating. Toys are everywhere before we created the playroom.

The door (shown below) was the original entryway into this room. It is now where the t.v. sits and on the other side, our fridge in the kitchen - if you missed these 'before and afters' and wanted to see them click here, and here.


Below more AFTER images of the lounge. The first image (sorry about the light but it was very bright this morning) shows the cafe style bi-folding window with seat that we put in. This leads out to our front courtyard and entryway.

Below the AFTER image of the playroom entryway - we have tried to make it look as 'adult' as possible from the doorway.

Below is the AFTER image of the playroom .... when you walk around the corner - this is what you see - all the girls toys! Yes, I have put tags on all the baskets for ease of finding where each type of toy goes - I know, it's the Virgo in me!!


The final AFTER image of the playroom shows the craft area - I did a post a while back about the pin board I found in an op shop for $4.50 - here it is in situ.


Lastly, on to my Hard Rubbish find! I was driving through a neighboring suburb on Wednesday and oh my gosh if I didn't spy a Casala chair out of the corner of my eye!! Well, my heart skipped a beat as I did the u-turn to go back to have a look ...... not 1 but 2 Casala chairs!! Okay they look a little bad right now all dirty and covered in cobwebs, but, they will clean up okay and I will then have them resprayed for my new side deck that is being started next week. Yay!!!


Oops, just realised I said I would post an image of my kitchen again as it looks 'today'. Sorry, I will do it next week.
If anyone wants any contacts for tradesmen or companies in Brisbane re renovation, just ask - I have folders brimming with contacts as this is reno number 4 for us.
Hope you all have a great weekend - we are just doing a bit of work on the house ready for next weeks phase two to begin. Michelle

Friday, July 9, 2010

More Reno Before & Afters

Hope everyone has had a great week. Sorry I have not visited anyone this week as I have been very busy with school holiday 'stuff' and filling wholesale orders for stores. I hope to knock on all your doors over the weekend.

As promised, some more before and after images are to follow. I have only included our outdoor entertaining space and kitchen today - and not the final kitchen image I am sorry as it was too dark when I got home to get a good photo :( I will also show you the lounge etc. next week as the light just got too bad! Once again please forgive the ..... ahem ..... 'unstaged' look of our home.

Below is the outdoor entertaining area at the back of our house as it looks today. Sorry about the leaves in the pool - it was very windy today!

We had the pool completely renovated (resurfaced) and the tiles outside replaced to match the new tiles indoors. We also installed a glass pool fence. The image below shows looking from inside out towards the pool.


The image below shows how it looked before (yuk)! The lattice (not my fav) and the old pool fence really closed in this space.

On to the kitchen, if you want to see what the old kitchen looked like, please refer to Tuesdays post here. The room below shows where we created the new kitchen - it runs right next to the laundry and downstairs bathroom, so it made more sense to locate the kitchen here for ease of flow and a cohesive design (the 'ghost' in the laundry was someone who didn't want to be shown in the image). The door shown on the second image below is where the fridge now stands in the new kitchen, this was the old door to what we now use as our lounge. Are you confused yet, because it's getting late and I know I am!!


Below shows part way through the renovation.......


Below is the new kitchen, some of these pictures were taken before we painted etc. The light was so bad today I had to use some images I already had. Will take a better one for next week.

Looking back at all these pictures made me realise how much we actually have done! Not that far to go now to finish the whole thing off .... looking forward to that day so we can have a bit of a rest and enjoy it before we move on. Thank you all for your lovely comments on my previous 'before & afters'.

Hope you all have a great weekend. I am exhausted, and, just between you and me, can't wait for pre-prep and daycare to start back next week! Think I'll spend my weekend trying to catch up on some sleep! Michelle

Tuesday, April 27, 2010

I Wish .....


We are currently looking at design history in my course, one of the best ways to understand how design has changed over the years is to look at the history of the chair. Todays lecture saw me daydreaming about one day owning an original Grant Featherston like the ones in the images above. These designs are my absolute favourites and are definitely on my wish list. Addvintage currently have a Featherston similar to the top one for sale in the store (needs new upholstery) ...... I always look at it when I go in and dream that one day I will also own an original!

Friday, April 16, 2010

Relaxing Retro


Thought I would start the weekend off in style by posting some beautiful retro inspired images. Both of these images are taken from Apartment Therapy and show how you can incorporate vintage style with a modern interior. The top image is of an Egg chair designed in 1957 by Arne Jacobsen (on my wish list). No retro inspired interior is complete without a gorgeous vintage sideboard like the one being showcased in the second image. I love the way the sideboard and shelves are 'stacked' with vintage vases, books and bowls but that it doesn't look cluttered or over-the-top. The large retro lamp balances everything beautifully. These images make me want to rearrange my interior immediately! Hope everyone has a good weekend.